2019-15 - Exploration of a chat like design pattern (chat wizard)
Purpose
Transforms a simple form into a conversation like experience used as a wizard. It displays a bubble in the bottom right corner allowing to start the “chat”. At any moment, user can switch between enhanced chat window back to the “basic” form. Chat wizard is built to meet accessibility.
Use when
A wizard would help users find their way in content and point them to the right information through a decision tree pattern.
Do not use when
A form could be replaced by the chat wizard for a more dynamic experience.
Working examples
Working examples on Canada.ca
How to implement
There are two ways to implement the chat wizard. The more common way is to code a form, and add according classes and data attributes. The other way is to load it from a JSON file, which will generate both the form and the wizard, is useful in case one would want to implement the same chat wizard on multiple pages.
1. Code a form
- Code a form that has a decision tree logic, with the idea that an answer could affect what the next question would be. At the moment, all choices of answer to a question must be radio buttons only.
- Wrap your form in a section, aside or div tag with a class named “.wb-chtwzrd”, along with the class “.hidden” to avoid the basic form to flicker on load. Other options are:
- A data attribute named “data-wb-chtwzrd-avatar” can be added with a path to an image in order to change the default avatar in the bubble and the chat window. Recommended dimensions are 45x45 pixels.
- A class named “.wb-chtwzrd-inline” can be added to have the chat experience inside the content and not in a separate window. This feature should only be used on a dedicated page, since it will start right away and steals the show to other content.
- Give it a title (outside of you form) as an H2. That heading will be the title of the form, as well as the title of the chat window and the text of the notification message.
- The action of your form will be the default destination page at the end of the flow. The method will define if the form will be submitted through the URL bar or in the body at the end. You can give it a name attribute too, for tracking purposes.
- You will need to start your form with a greetings paragraph. That paragraph must have a “.wb-chtwzrd-greetings” class and will be the first message coming from the bot when the chat window is opened.
- Same thing for the last message at the end of the conversation which is a farewell paragraph that you can put at the bottom of your form and that needs to have the “.wb-chtwzrd-farewell” class.
- If you add a regular paragraph right after your greetings one, this will be considered as an introduction message, which will be mentioned by the bot right after the greetings.
- The submit button is necessary as it indicates what the final submit button will show at the end of the conversation. Plus, you can add a data attribute there named “data-wb-chtwzrd-replace” that allows you to give a different value to your chat wizard than what’s in the form. This data attribute can be used on almost every textual tag inside the “.wb-chtwzrd” container to indicate what the chat wizard should display different than what the form displays.
- In the form itself, each question must be wrapped around a fieldset tag, with a unique ID attribute. 10. The question has to be in a legend tag, to which for instance you can use the “data-wb-chtwzrd-replace” attribute to have a more conversation-based question for the wizard.
- Choices of answer must be in an unordered list, with a class named “.list-unstyled” to not show the bullet points and a class “.mrgn-tp-md” for spacing at your own taste.
- The label tag has to wrap your input of type radio, with the text value wrapped in a span tag.
- The input itself has a name that represents that question in the final GET query string or POST, along with the value attribute for this input in particular. Also:
- The data attribute named “data-wb-chtwzrd-next” must be used on the inputs to indicate the next question (fieldset ID) to present to the user. The last question of any possible conversation in the decision tree must have that data attribute set to “none”, in order to end the conversation.
- The data attribute name “data-wb-chtwzrd-url” provides the plugin with the updated destination of the redirection at the final submit.
There you have it! A conversational-like experience driven by a fairly simple form.
2. Import a JSON File
Accepting JSON File as an input for batch deployments. If you have a JSON file that follows the Data API logic shown below, it can be implemented as a chat wizard instance.
All you need on your page is to add a data attribute named “data-wb-chtwzrd-src” to your section, aside or div tag that has the “.wb-chtwzrd” class, and provide it with the path to your JSON file.
Source code
Get the three pieces that you need here:
You will have to readjust the path to the avatar image in the CSS file depending on your own implementation set-up. The code was altered from the one on Canada.ca in order to make it work on its own and not as a plugin part of GCWeb. It still needs a base style from WET or GCWeb however.
Alternatively, you can get the always up-to-date code on Canada.ca:
You can hit “CTRL + F” and search for chat wizard in both the CSS and the JavaScript files, or just look near the end of the files, it’s all in there; nothing more, nothing less. However, it needs jQuery as a dependency; if you are using GCWeb, you are covered.
Rationale & history (previous documentation)
Goal
- Evaluate the accessibility level of a chat like web interface.
- Draft a list of some technical accessibility design requirement.
- Draft an high level plan.
- Prototype that plan.
- Improve that prototype.
- Go Live.
Some existing tools
BotUI
- Github: https://github.com/botui
- Example: A JavaScript framework to build UI for your bot
Good starter kit / example to build a simple, reliable, robust, and nonetheless accessible bot.
Quriobot
- Example: Build your own chatbot
Neat design and well built features wise. The possibility to go back in the conversation and the UI feedback on every input keeps the user engaged and supported in their journey.
Landbot.io
Pretty straight forward example of what a conversational form is conceptually. Note that there is a possibility to resume a conversation that happened in the past, which is a great feature in theory. In the back-end, a decision tree is defined on a draw board, which makes it easy to build your own conversational form or chat bot.
Conversatinal-form
- Github: https://github.com/space10-community/conversational-form
- Example: Turning webforms into conversations
Visually, esthetically, the interaction pattern and it’s configuration look easy to use from a author perspective. It’s rendered interactive user interface of a chat provide a nice user perception of an intimate website experience.
However, a quick look at the rendered content markup and the source code of the page has revealled a lot of web accessibilty error and potential error. Baed on the type of error there could be a considerable effort and testing to make that feature conforming to the web accessibility guideline.
The conversation flow seems to be set into one unique path.
Findings
- Nice concept of tranforming a simple form into a conversation.
- There is a lot of web-components. More HTML semantic that differentiate each pieces of the conversation like a list or sectioning would be a must.
- The focus are not always visible in that working example.
- We can not access to all controls via the keyboard. For example the toogle to switch the conversation into a form and vice-versa.
- Answer provided in the conversation can be removed or modified. It can only be done via mouse, not keyboard operable, and its behaviour aren’t fully predictable in that UI. One click modify and the second click delete the last answer.
- There is an attribute “role” that have an invalid value and there various other minor markup issue.
- The input in the conversation are validated, like if the question require an email, the converstaion verifiy if the email is valid, but it only show the error in the input placeholder and are not persistant.
- All the field seem to be required, even the ones that are not marked as optional in the source code. But if the input is a type-text, it accept empty value.
Plan draft
- Concept
- Create wireframe.
- List a few basic requirement to meet web accessibility
- Create a story that illustrate each iteraction scenario/functionality of the enhancned interface.
- Do an environmental scan of existing similar tools
- Feature integration
- Create wireframe
- Create functional HTML prototype
- Test for WCAG 2.0 Level AA conformance
- Enhanced interface
- Create static HTML prototype (markup snapshoot) of the whole conversation for each key functionality.
- Test those prototype for WCAG 2.0 Level AA conformance
- Basic interface
- Define the basic HTML markup that are going to be enhanced into a conversation
- List all the configurations option required for the conversation enhancement.
- Create prototype of the basic HTML markup
- Test those prototype for WCAG 2.0 Level AA conformance
- Interaction developement (JS/CSS)
- Testing and debugging
- Documentation
- Other requirement for publishing the feature in wet-boew
Requirement and idea of suggestion
Web accessibility
- Ensure that all control can be controled via keyboard
- Feature integration ( page wide )
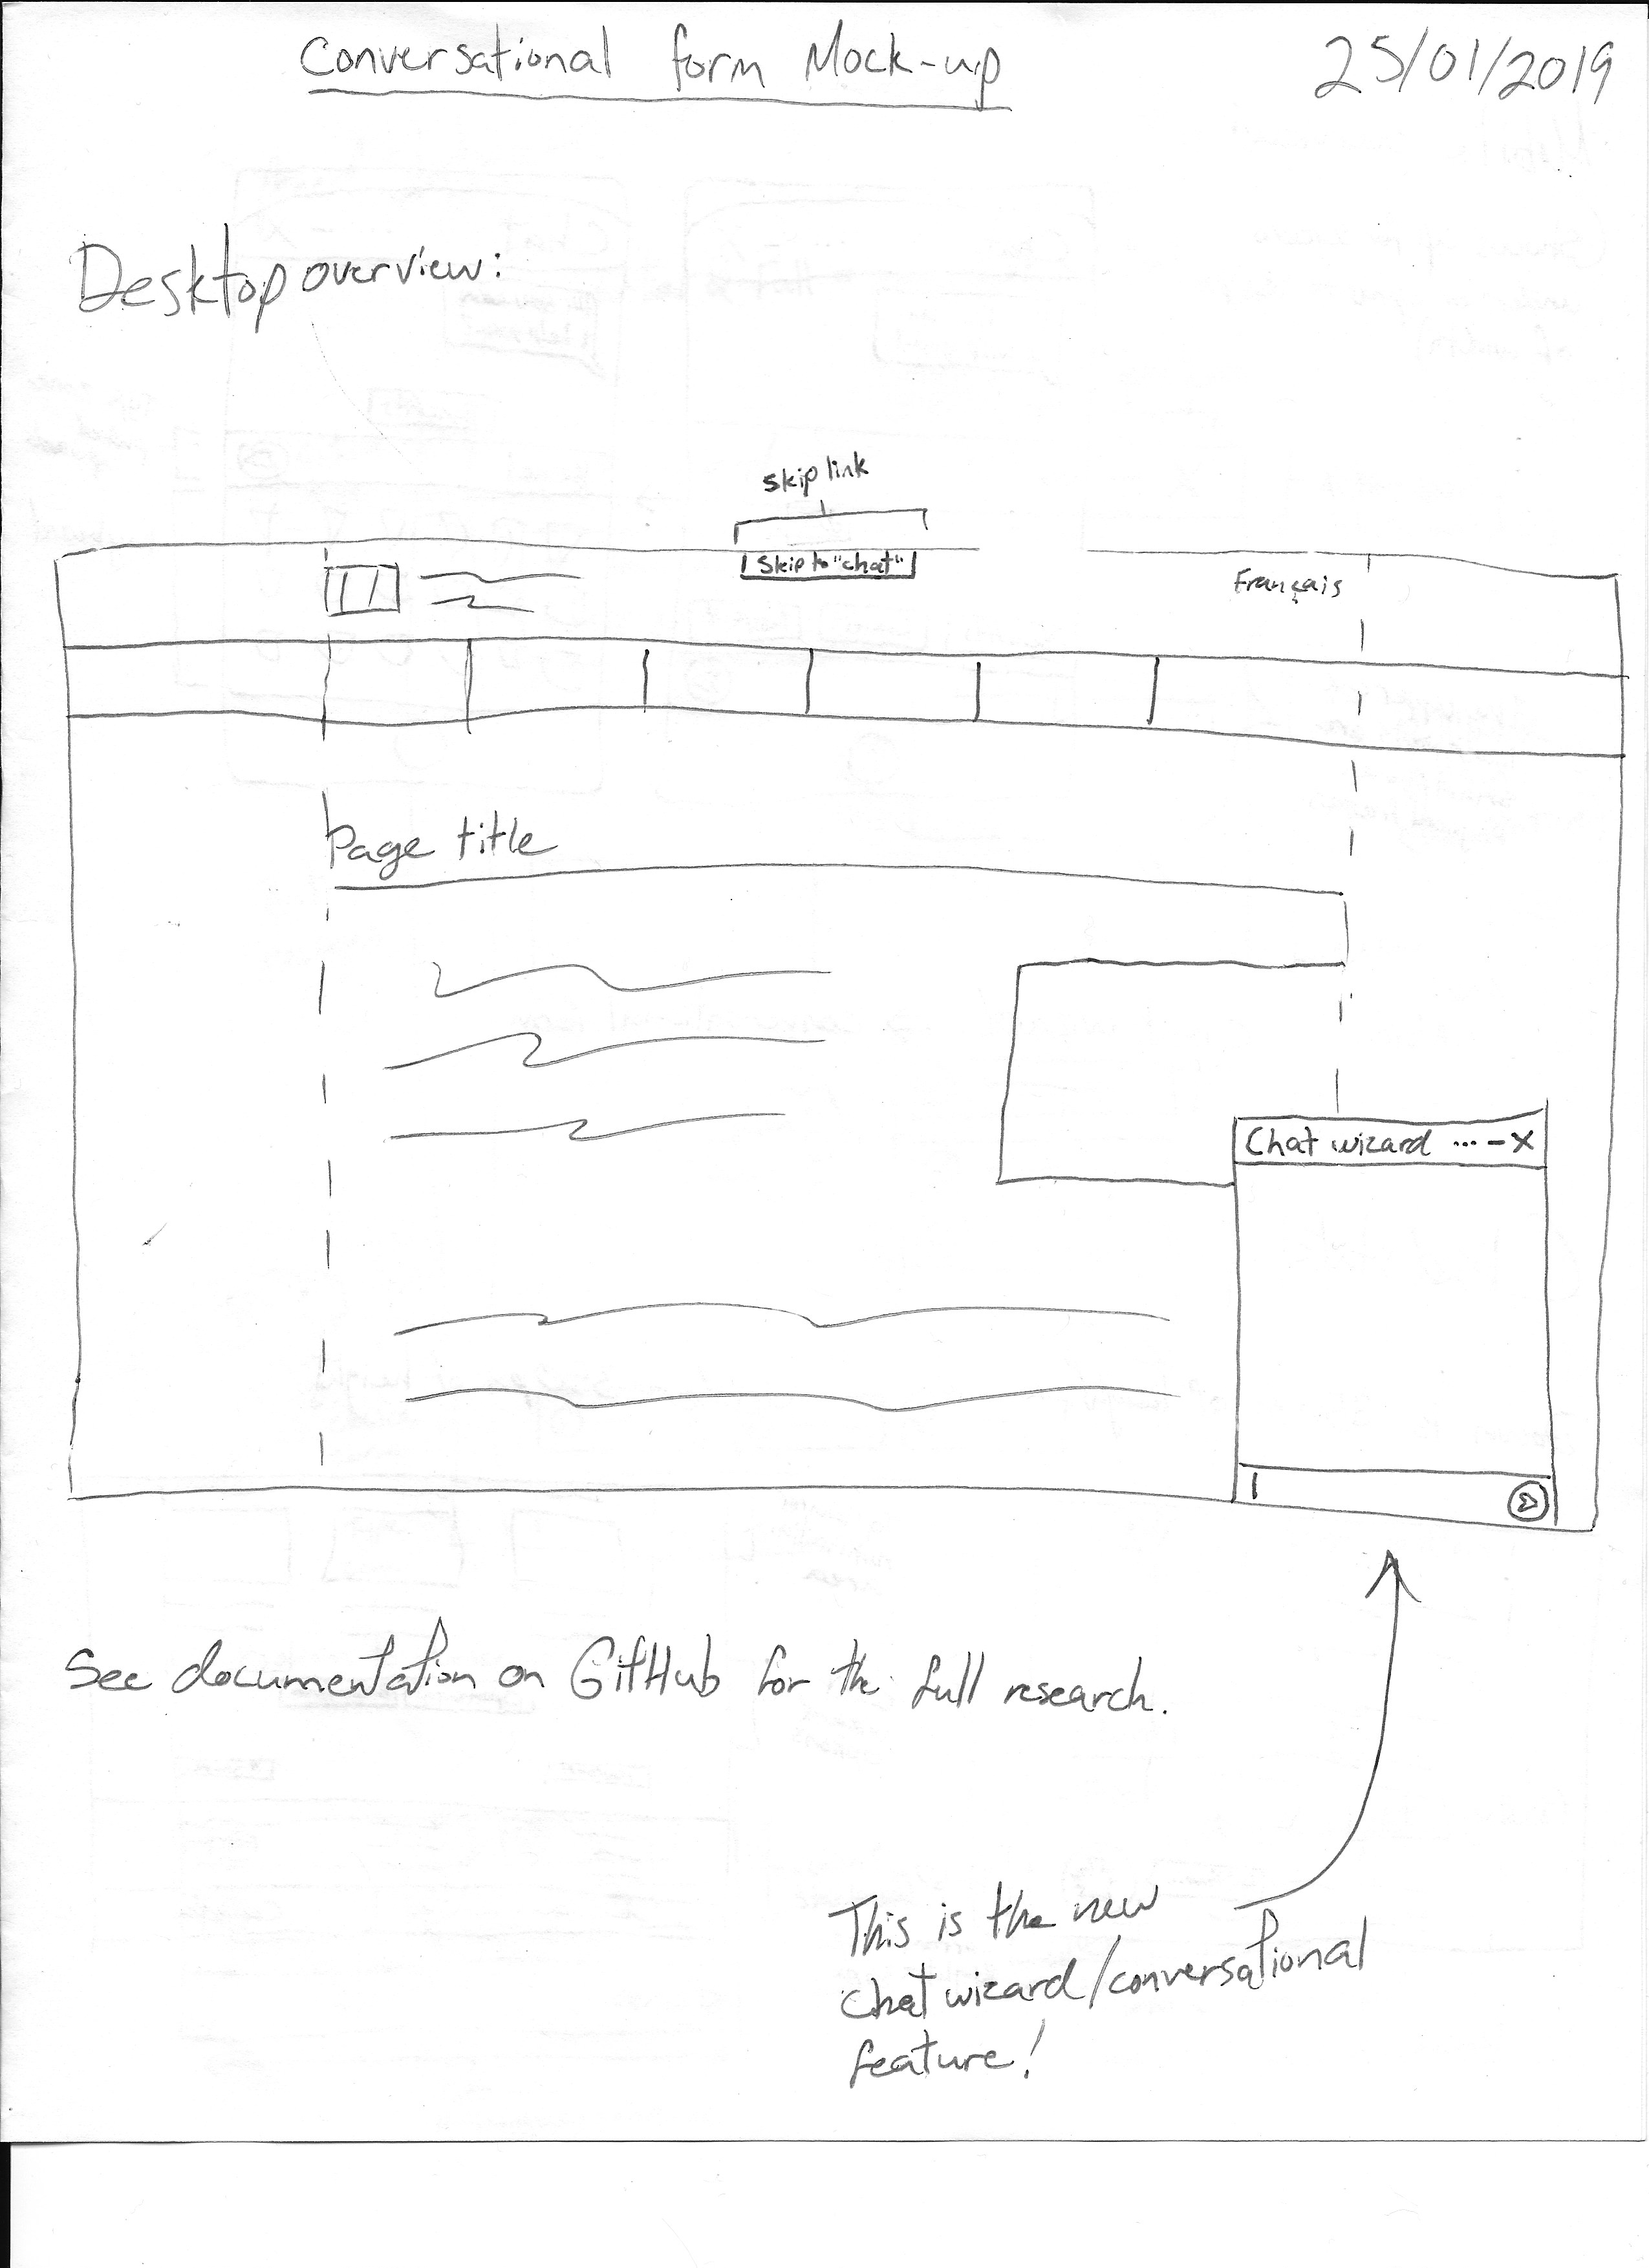
- Have the button to open up the conversation after and outside the main content of the page, unless it’s going to be specific at the page content (to discuss).
- Add a “skip to conversion” in the skip navigation links
- The button should become static after the main content when the page footer become visible (to discuss).
- Feature integration (in page)
- Ensure the surrounding text introduce the conversation and provide the static form alternative version
- Enhanced interface
- Can use CSS to have the button floating in the bottom-right, but this should be reviewed in small screen.
- When activated, there must be a way for a screen reader user to navigate through both versions and how they can switch between basic and enhanced.
- The conversion should be in a list or section.
- A skip link, after the input should be provided to jump in the past conservation.
- Ensure the interface contain all the necessary instruction, like how to modify what has been entered, etc…
- Make the update/delete label clear. Use a combination of text and icon.
- Let optional field to be optional (like able to skip) and idem for the required field.
- Basic interface
- No floating button in the UI
- Have the form hard coded after the button
- Can consider to add the form inside an expand collapse.
Potentially at risk
- The submit button becomes disabled when the question change;
- The wait time between questions, when the bot speaks, etc.
- NVDA screen reader repeats the answer given twice.
- Wizard window’s title is omitted using the NVDA screen reader.
Enhanced interface
- The configuration should be integrated in the basic html interface.
- Set the configuration to the label if those are used as such in the conversation UI
- Set the configuration to the input if those are related to the input and the data collected
- For radio or checkbox, use the legend of the fieldset container as the “configurable label”. Other makrup can be consider, like heading but we should target for a consistant markup.
Sizes
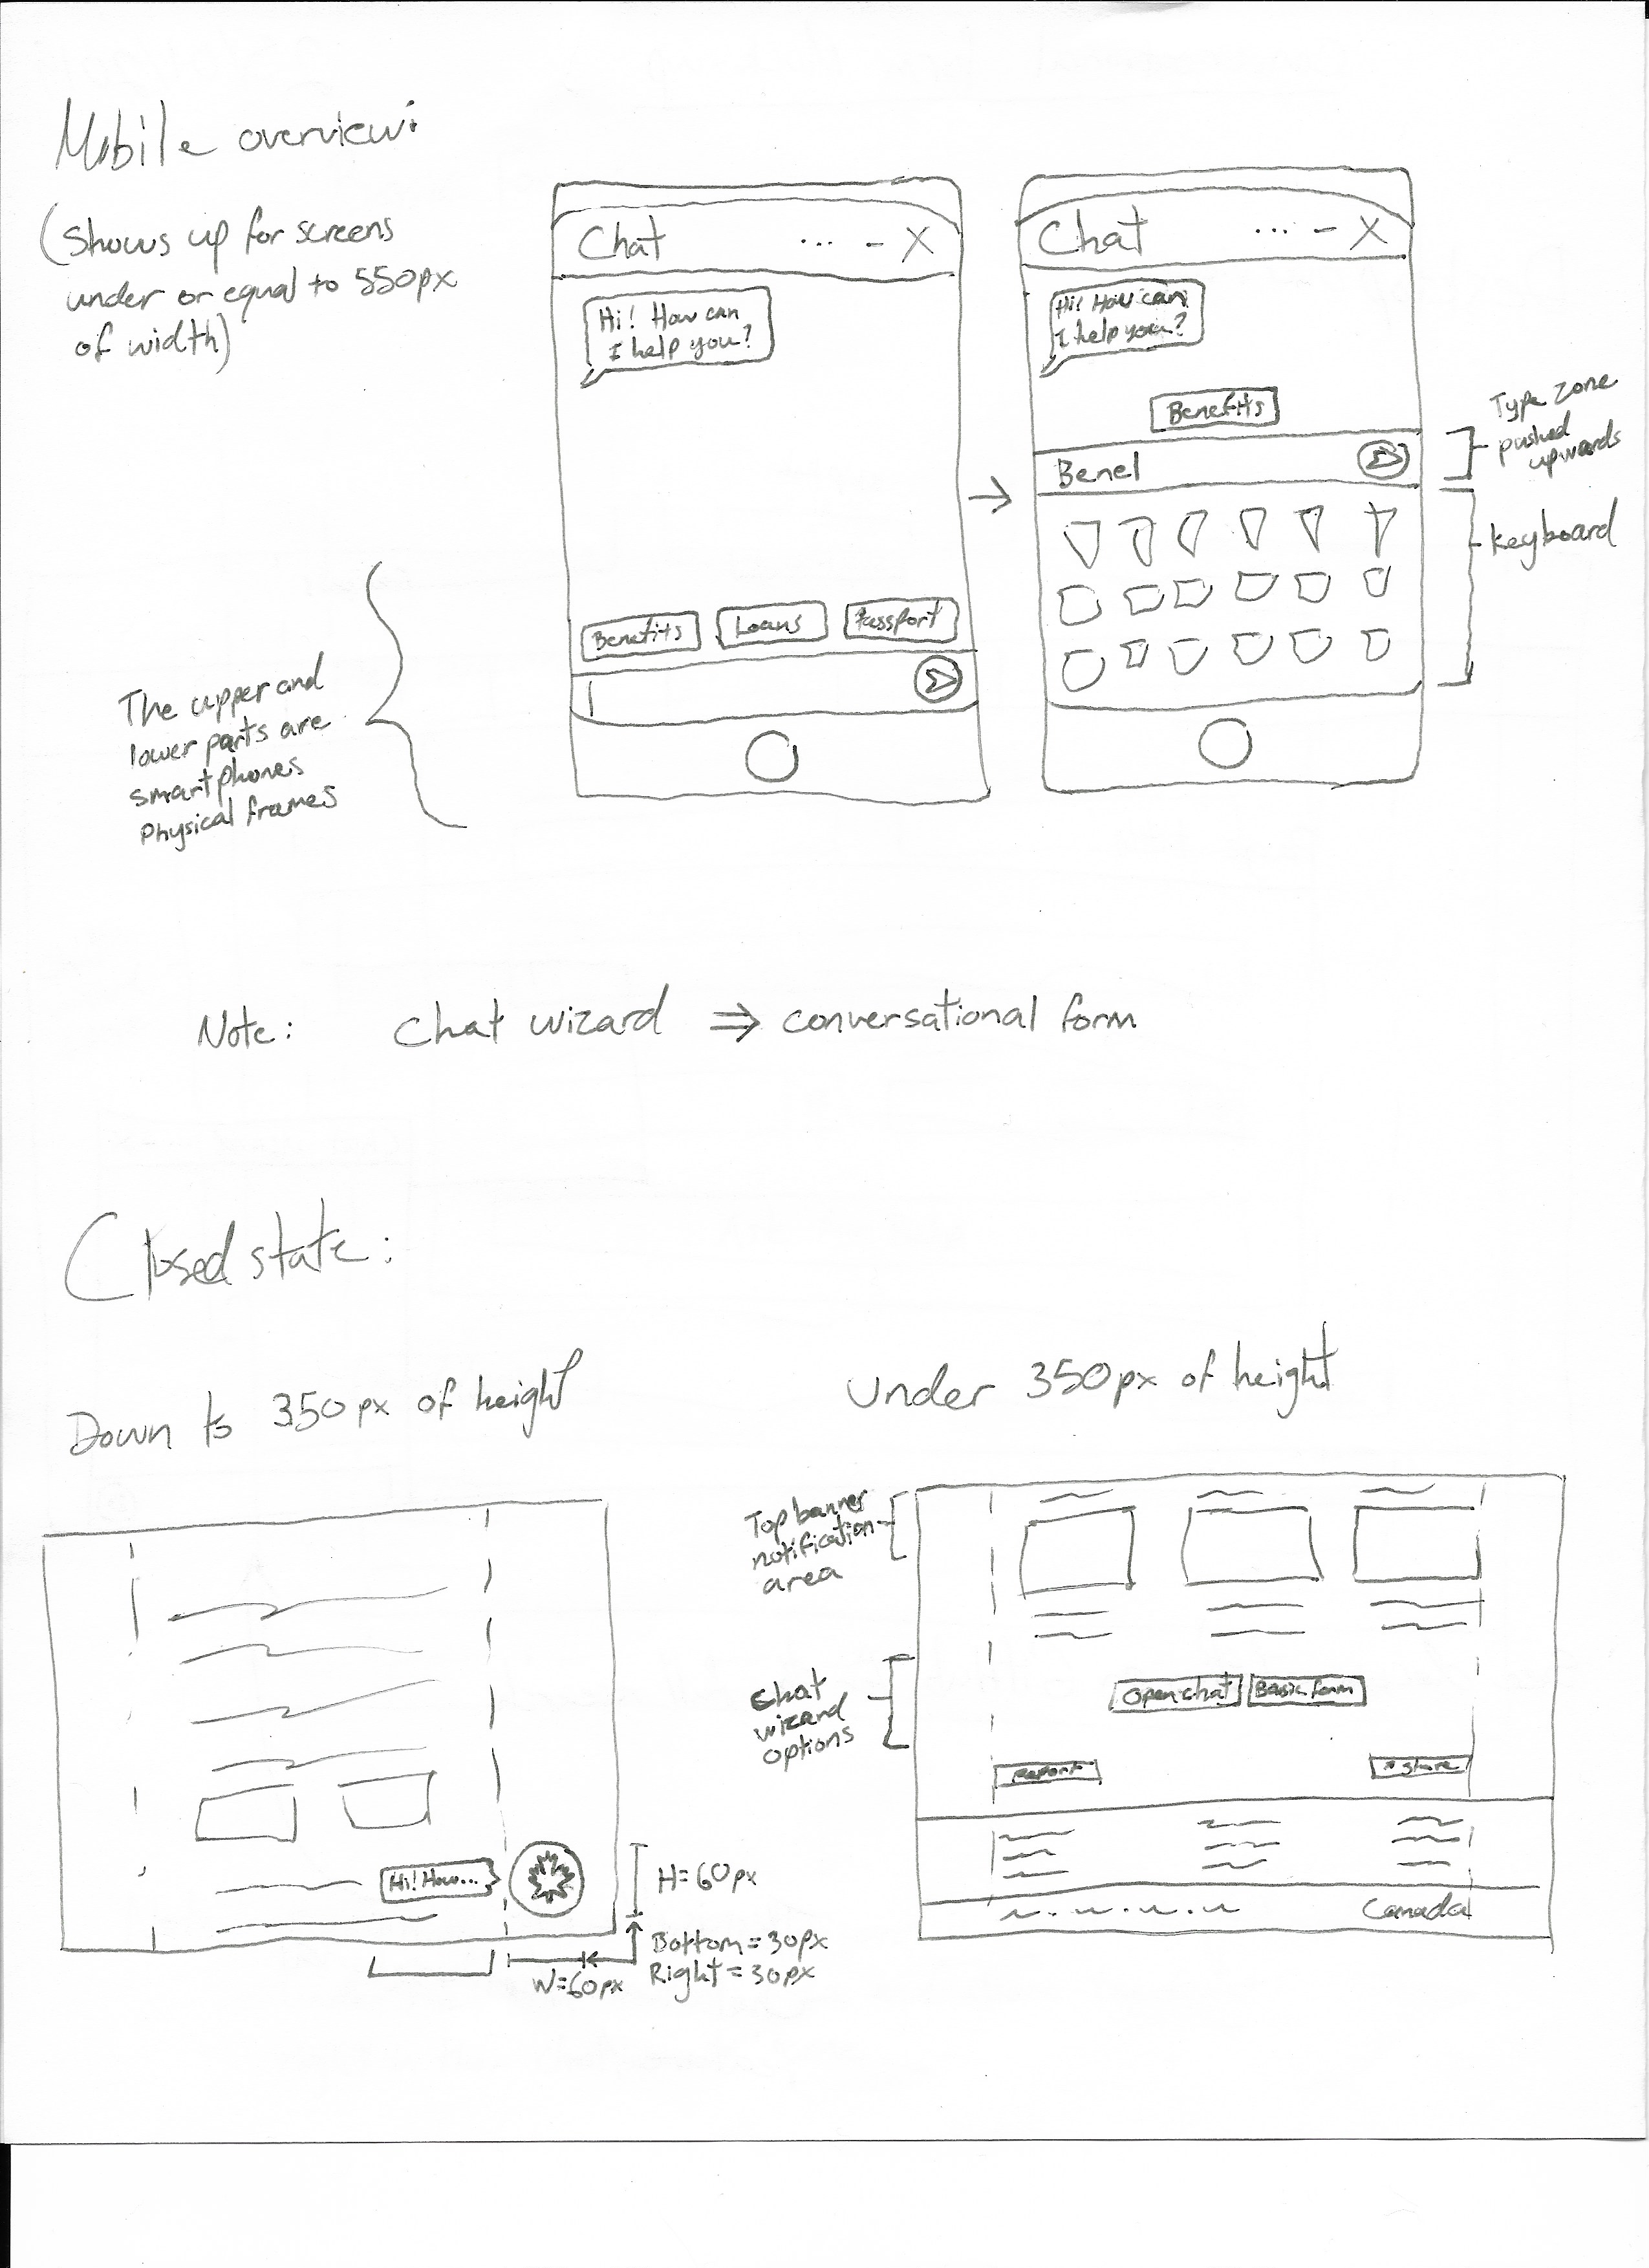
The thresholds are:
- Under and equal to 350 pixels of height:
- Basic interface is visible. Static button, on-page wizard and top banner notifications are used.
- Above 350 pixels of height:
- Enhanced interface is visible. Floating button and notification badges are used.
- Under or equal to 550 pixels of width:
- Enhanced interface is visible. Floating button, notification badges and fullscreen wizard are used.
- Above 550 pixels of width:
- Enhanced interface is visible. Floating button, notification badges and overlay wizard are used.
Rules
- All fields must be required for now. Or, include a version with all fields being optional in a future release
- User must be able to switch between basic form and conversational form (chat wizard) at all time
- Form has to be linear, which means no decisional tree, only one path
- No Form validation should be used, only inputs allowed are:
- Text
- Radio
- Checkbox
- Select
- Form submition must be handled client-side only
To think about
- What to do with the print version (if applicable).
- Change the plugin’s name? Currently: Chat Wizard.
- Add a “skip to chat wizard” in the skip navigation links?
- Add handler for Select tags.
First Release
- Supports radio buttons only.
- No basic html interface support.
- No “Skip this step” or “Back one step” links.
- No “Edit answer” button to roll-back in the conversation.
- Form and JSON support
Wireframes
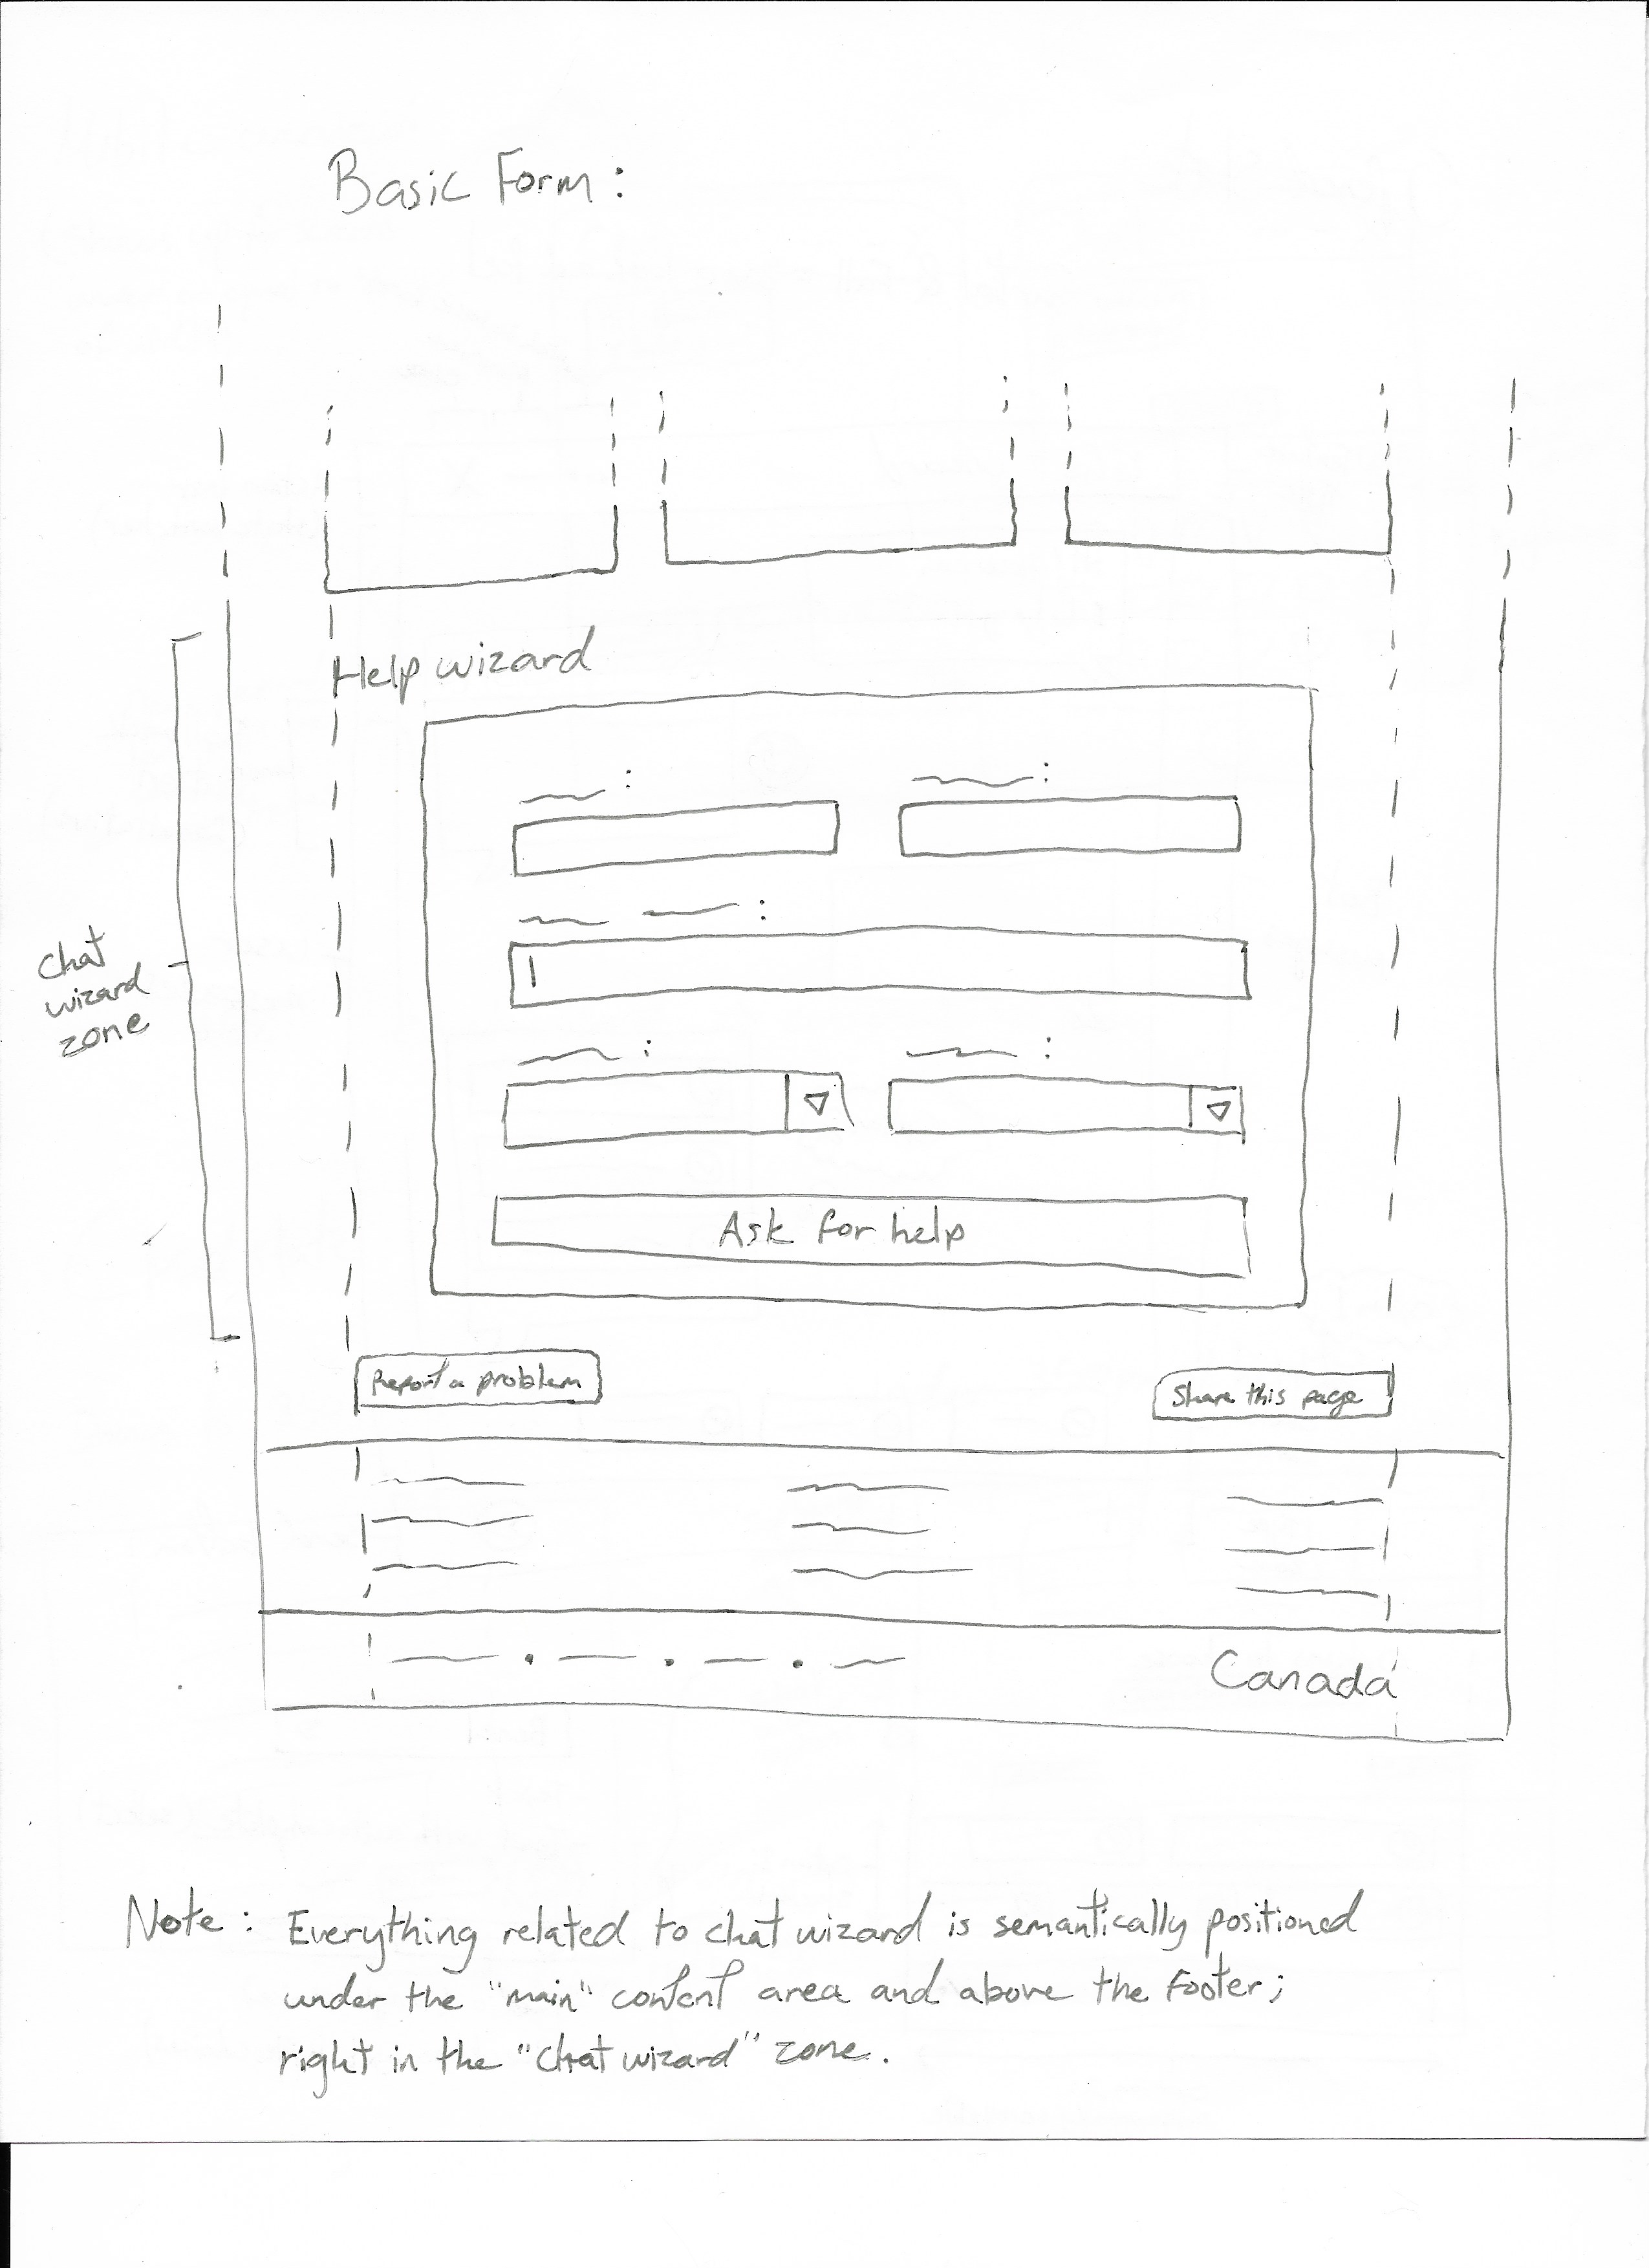
Semantically, the entire code related to the chat wizard should be located right after the closing main tag, assuming the chat is general and not directly related to the content. If the chat is related to the context of the page, then it should be placed underneath the H1 tag, rught before the first H2.
Closed State
The closed state is a state in which the user can only see a floating chat “bubble” to open the wizard, if the screen meets or exceed the screen size requirements. Under the size requirements, a static button can be found where the rest of the semantic for the wizard is.
Submit basic form
Needs content here.
Stand-By State
In this state, the user hasn’t opened the wizard yet, so the feature is equal to the Closed state. What differenciate the Stand-by state with the Closed one, Stand-by encourages the user to click on the bubble to open the wizard, with a notification.
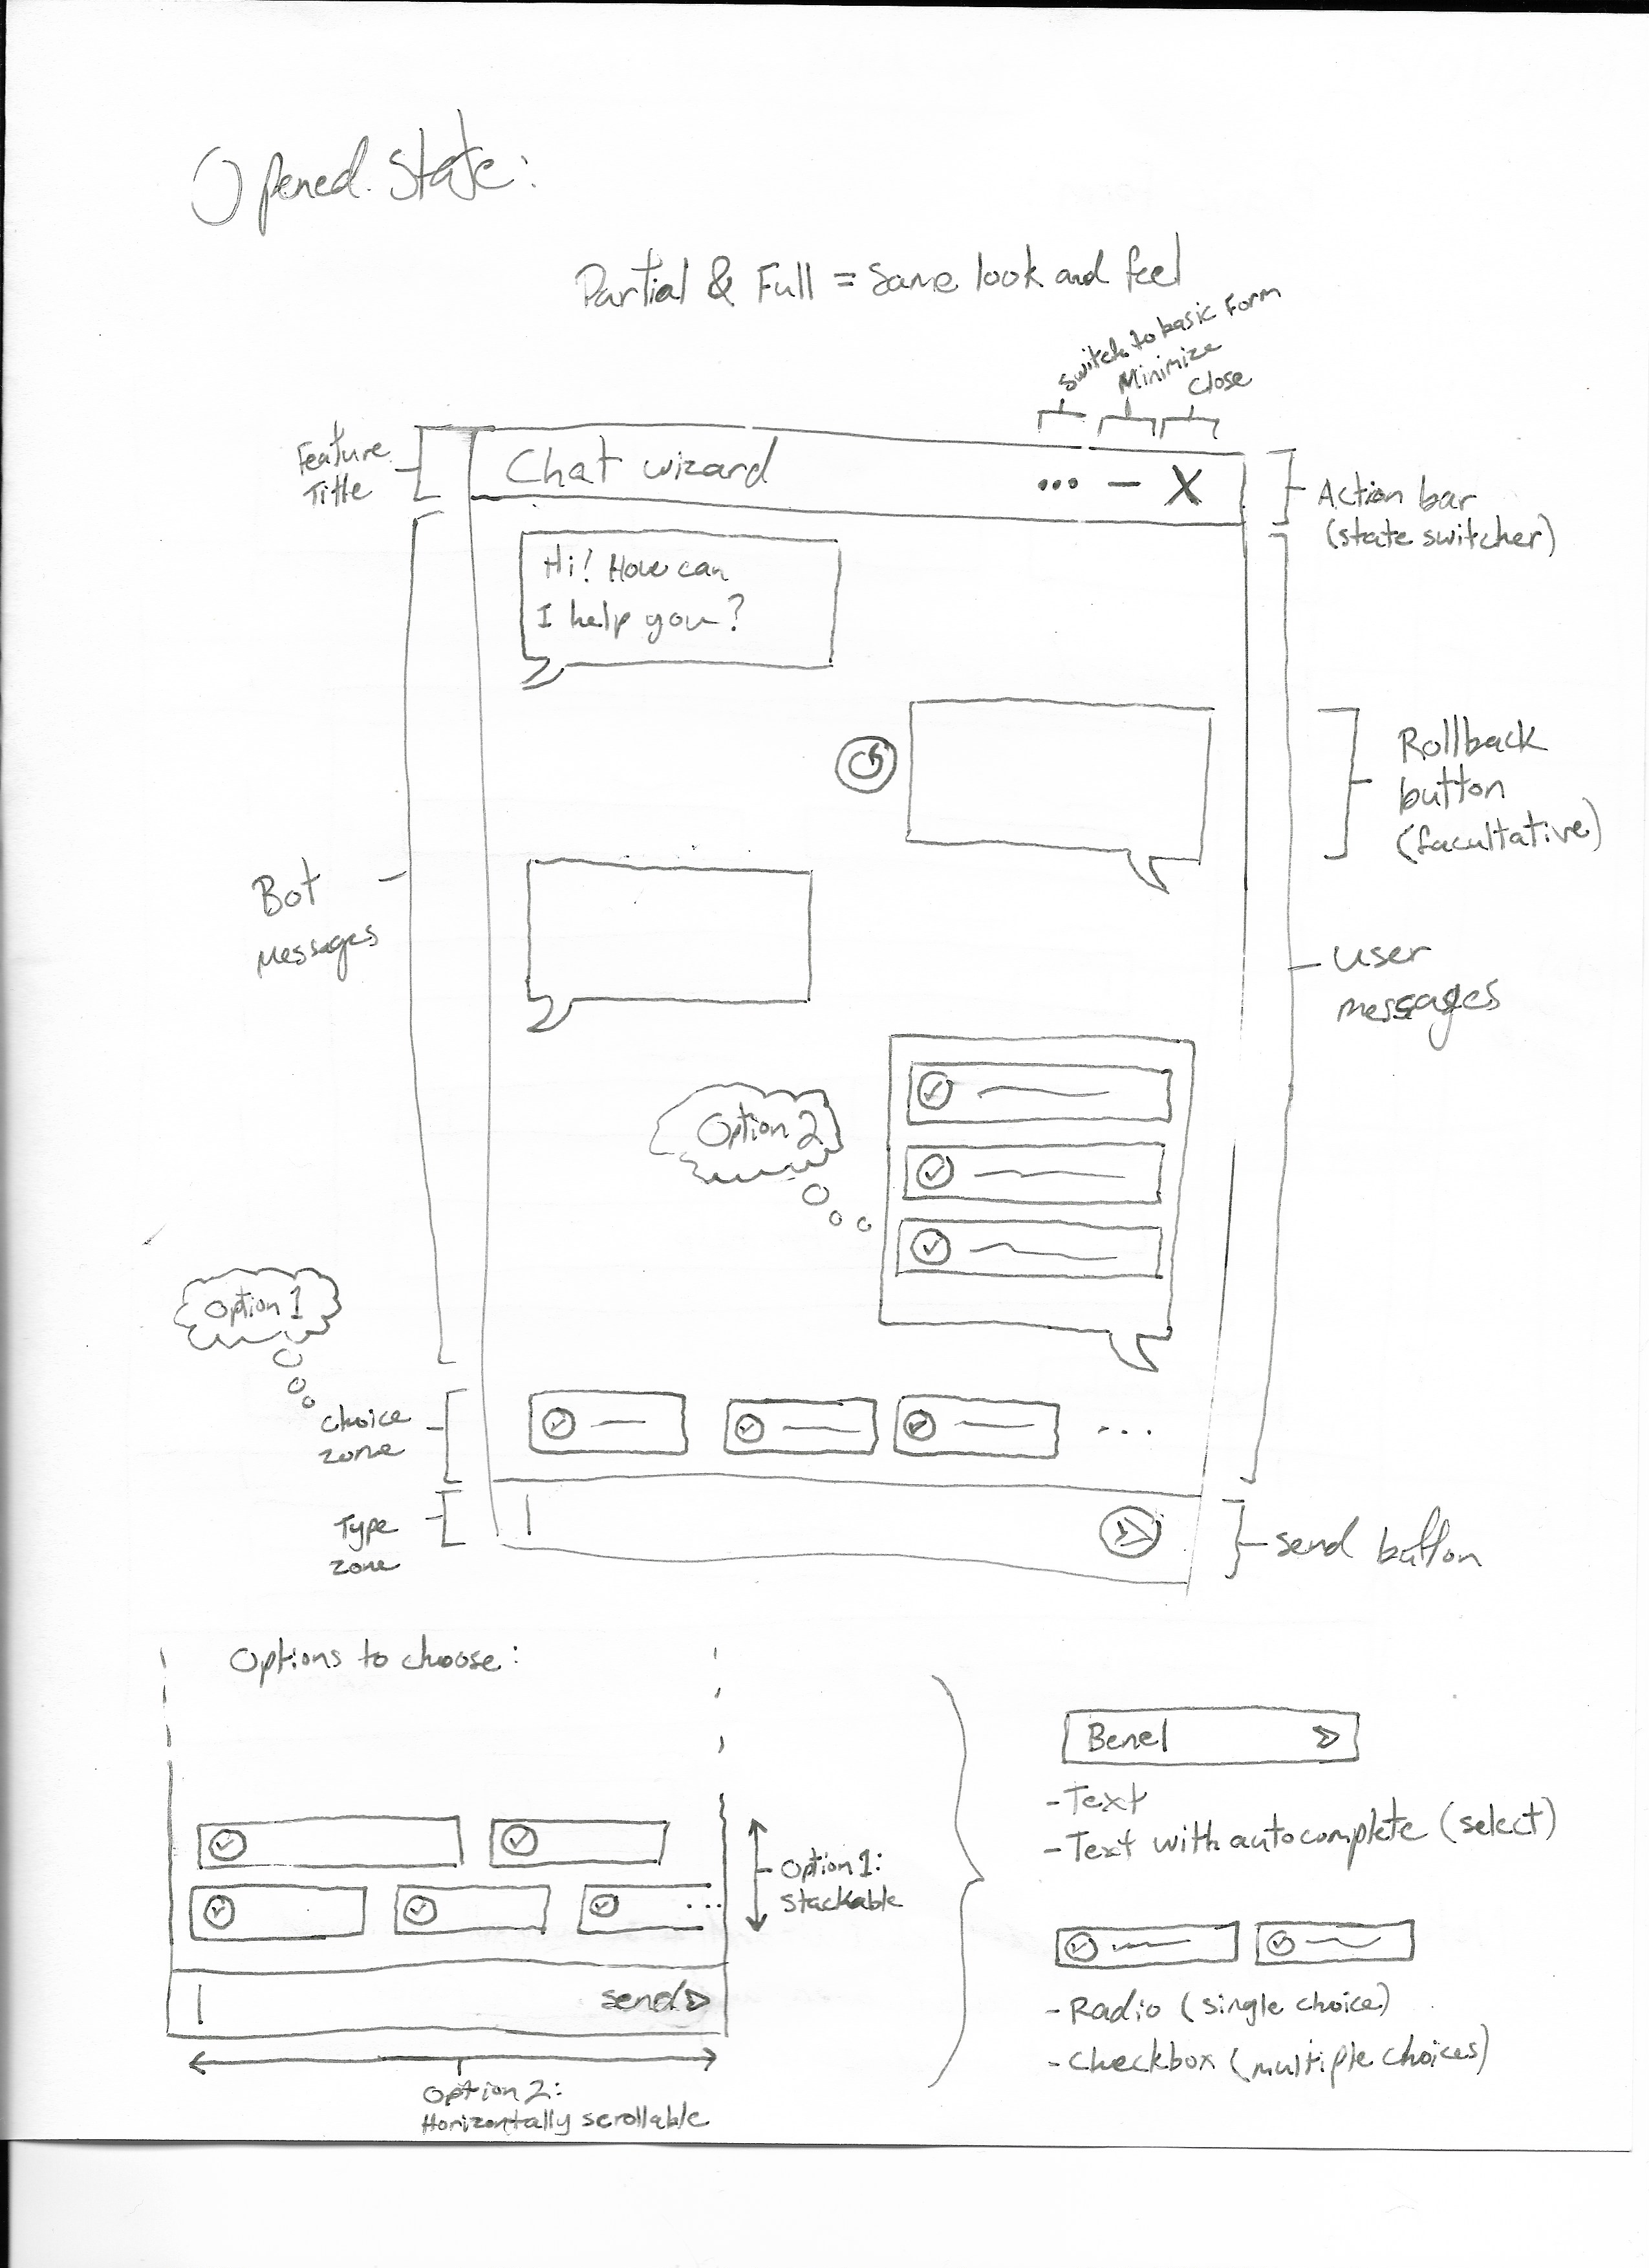
Opened State
Overlay
See images below. This is where the core of the feature is.
Fullscreen
Same window as in the overlay version, but taking the entire screen.
Basic Form
Simple plain form as an alternative to the conversational form, spitting out the same results at the end of the line.
Focus order
Default focus order matches the document structure, which is top to bottom and left to right. The focus is cyclic and keeps the user trapped in the form, but it can be escaped by selecting the close button at the end of the cycle. When the user sends a message, the next focus
Actions
Submit button and options
Options are inputs to fill, while Submit button sends the selected input value to the conversation in a message from the user, in answer to the question from the bot.
Minimize button
This button minimizes the chat wizard to its initial close state, but keeps the conversation “active”. Opening it back would resume the conversation from where it was left off.
Switch button
This button makes a switch between the conversational form and the basic form. It can be found in the header of the chat window.
Visual
Desktop
Mobile
Window
Form
Data API
Here is the JavaScript Object that is being generated and that must be followed in order to make the magic work. If a JSON file follows that logic, it can be implemented as a chat wizard instance.
Dependencies
- Plugin is supported on WET 4
- Some styles depend on WET’s Modal plugin
- jQuery (works with 2.1.4, previous versions were not tested)
Prototypes
- Concept Prototype
- Prototype 1 (Presented underneath this list.)
- Prototype 2
- Prototype 3
- Prototype 4
- Prototype 5
- First Demo
Prototype 1
Markup Basic Structure
See HTML Code
<aside class="chtbt-container">
	<header class="chtbt-header">
		<h2 class="chtbt-title">I can help you find the information you need</h2>
	</header>
	<div class="chtbt-body">
		<div class="chtbt-message-container">
			<h3 class="wb-inv">Conversation history</h3>
			<section>
				<div class="row">
					<div class="col-xs-9">
						<div class="chtbt-message">
							<div class="chtbt-bot-avatar">
								<span class="glyphicon glyphicon-user"></span>
							</div>
							<h4>Hi! I can help direct you to programs and services you might be interested in. Would you like to get started by answering a few questions?</h4>
						</div>
					</div>
				</div>
				<div class="row">
					<div class="col-xs-9 col-xs-offset-3">
						<div class="chtbt-message">
							<p>Yes</p>
							<p class="chtbt-rollback"><a href="#">Modify this answer</a></p>
						</div>
					</div>
				</div>
			</section>
		</div>
		<form class="chtbt-interaction-container">
			<h3 class="wb-inv">Conversation interaction</h3>
			<fieldset>
				<legend>Are you:</legend>
				<ul class="list-inline">
					<li>
						<label>
							<input type="radio" value="young" name="q2" />
							a young Canadian
						</label>
					</li>
					<li>
						<label>
							<input type="radio" value="emloyer" name="q2" />
							an employer or organization looking for funding to support youth
						</label>
					</li>
				</ul>
			</fieldset>
			<button type="submit" class="btn btn-default">Back</button>
			<button type="submit" class="btn btn-primary">Next step</button>
			<button type="submit" class="btn btn-link">Skip this step</button>
		</form>
	</div>
</aside>
Alpha Version
Beta version
How-to
Code a Form (To be revised)
In order to be configured properly, you need the following:
- Add a form to a page and include the “wb-chtwzrd” class to either the form or its container (if it is contained in a row on its own).
- In the form tag, you must have a filled action attribute and you must include a data-attribute named “data-wb-chtwzrd”, with the following properties inside of it, in brackets {}:
- formType: “dynamic” or “static”. (Optional, “dynamic” by default) A dynamic form will be needed if you can assume that the next question is dependent on the answer provided. Use “static” if you are using a static form, or other kinds of plugins affecting your form.
- sendWizard: “string”. This text is the value of the button at the end of the conversation in the chat.
- titleWizard: “string”. Title of the chat, showing in the chat window banner, as well as in the notification popup.
- startText: “string”. Greeting message from the chat. THis is the very first message that the bot will send in the conversation, before the questions.
- endText: “string”. This is the last goodbye from the bot after all of the questions have been answered.
- first: “1”. Identifies the first question after the bot’s greetings, by qID.
- A second “greeting” message from the bot can be added in a paragraph before the questions, in order to provide extra information or instructions. This is optional. In the case where this message should be different from the paragraph in the basic form, the data-attribute “data-chtwzrd-intro” can be used to provide a different text.
- Regarding the questions, the only inputs that can be handled by the plugin are radio buttons at the moment. A proper HTML markup must be used for the plugin to catch them. The following structure is to be followed:
- fieldset > legend > input.
- Along with the proper markup, a data-attribute called “data-chtwzrd-q” must be added to every legend tag containing the inputs, with the following properties:
- qId: “1”. Question Identifier.
- labelWizard: “Are you:”. Question shown in the chat. This data-attribute is required, even if the text is the same as in the actual legend tag.
- Every single input tag must have a data-attribute called “data-chtwzrd-a”, containing the following properties:
- next: “2”. Identifies which question is next if this option is selected, by qID.
- url: “wxyz.html”. If this option modifies the form’s action at the end, this attribute will change it. Note that If you change the action to “abc.html” at question #2, then the action will remain “abc.html” for the rest of the form until you change it again in a further answer.
- Also, the name and the value attributes of the inputs are used as parameters in the form submit, like any regular form with a GET method.
- The text value placed after your input must be wrapped around an HTML tag, like a span, and you can use the “no-chtwzrd” class on an element if you want to ignore it from the text value, e.g. an image.
- Note: You can have any containers you want for your form, as long as you wrap it all inside the “wb-chtwzrd” class. The toggle would affect the spacing in your page if you don’t wrap it all. Finally, a “wb-inv” class should be added to the element that has the “wb-chtwzrd”, in order to prevent flickering on page load.
Example (Subject to change)
This is your HTML code
<section class="wb-chtwzrd wb-inv">
	<h2>Help us help you</h2>
	<form data-wb-chtwzrd='{"sendWizard":"Show results", "first":"q1", "titleWizard":"I can help you find the information you need", "startText":"Hi! I can help direct you to programs and services you might be interested in. Let's begin...", "endText":"Thank you. I have built a page with results you may find resourceful."}' action="page1.html">
		<p>If you are an employer or organization looking for funding, you can find relevant information on the <a href="pagex.html">funding page</a>.</p>
		<fieldset>
			<legend data-chtwzrd-q='{"labelWizard":"Are you:", "qId":"q1"}'>What would you describe yourself as?</legend>
			<ul class="list-unstyled mrgn-tp-md">
				<li>
					<label>
						<input type="radio" value="young-canadian" name="describe" data-chtwzrd-a='{"next":"q2"}' />
						<span>a young Canadian</span>
					</label>
				</li>
				<li>
					<label>
						<input type="radio" value="employer-organization-funding-support-youth" name="describe" data-chtwzrd-a='{"next":"none", "url":"page2.html"}' />
						<span>an employer or organization looking for funding to support youth</span>
					</label>
				</li>
			</ul>
		</fieldset>
		<fieldset>
			<legend data-chtwzrd-q='{"labelWizard":"Great! And are you:", "qId":"q2"}'>In what situation are you?</legend>
			<ul class="list-unstyled mrgn-tp-md">
				<li>
					<label>
						<input type="radio" value="high-school" name="situation" data-chtwzrd-a='{"next":"q3"}' />
						<span>a high school student</span>
					</label>
				</li>
				<li>
					<label>
						<input type="radio" value="cegep-student" name="situation" data-chtwzrd-a='{"next":"q3"}' />
						<span>a CÉGEP student</span>
					</label>
				</li>
			</ul>
		</fieldset>
		<fieldset>
			<legend data-chtwzrd-q='{"labelWizard":"Awesome! And would you like to:", "qId":"q3"}'>What is your goal?</legend>
			<ul class="list-unstyled mrgn-tp-md">
				<li>
					<label>
						<input type="radio" value="get-job" name="goal" data-chtwzrd-a='{"next":"none", "url":"page3.html"}' />
						<span>get a job</span>
					</label>
				</li>
			</ul>
		</fieldset>
		<button type="submit" class="btn btn-sm btn-primary">Search</button>
	</form>
</section>
Import a JSON File
Accepting JSON File as an input for batch deployments. If you have a JSON file that follows the Data API logic shown above, it can be implemented as a chat wizard instance.
- All you need on your page is the following section or div tag, with the right data attribute which is “data-chtwzrd-src”:
<section class="container wb-chtwzrd wb-inv" data-chtwzrd-src="path-to-json/form1.json"></section>
To do
- Rework documentation for WET implementation to match latest code updates.
Improvements planned
- Working with checkboxes (with the constraint of having either all the checkboxes going to the same form action or not changing the form action at all for checkboxes).
- Fix potential screen reader unwanted behaviours (which are not breaking functionnality).