Construire la BOEW
Needs translation
About
The build process allow developers to add new functionality (such as jQuery plugins) to an initial source folder and process these files into a final build folder. Publishers and developers are also free to add new functionality without using the build process. However, there are many benefits to adding code to the src folder and building it:
- Automate optimization tasks
- Fewer files, therefore less concurrent HTTP request that slow down mobile devices
- Smaller files for quicker download
How does it work?
WET 3.x components are compiled through a build process, which is run using a variety of ant scripts. The build.xml file on the root is the main ant build file for the project. In addition, each folder under the src folder has its own build.xml file. The main purpose of the ant script at the root is to run the other ant scripts in the project and clean up existing files.
These additional ant build files in the src folder do a variety of different things depending upon what is included in the folder associated with the build.xml file. For example, if there is a SASS component in a folder with a build script, a compile.rb script will be run (located in the build folder) to compile SASS code into CSS.
These build files shouldn't have to be changed unless new functionality is added or new directories are included in src folder. For example, new themes need their own ant scripts as they are seperate entities with many different components. However, changes to the build are not needed when adding a new jQuery plugin or modifying existing functionality.
The "build.xml" file is the main build script and sits on the root. "Build" is the final build folder, "demos" includes sample web pages and the "src" folder has the initial source files. The "build" folder also includes some other build components, including ruby scripts which are responsible for SASS to CSS conversion. The "src" folder includes a series of sub folders with their own build scripts.
Running Ant script on the command line
Software requirements
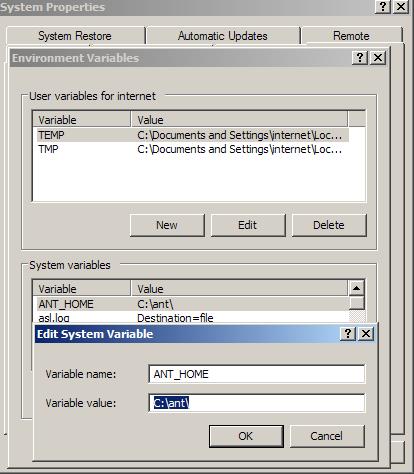
In order to run Ant from within any directory on the command line, you need to set up your environment variables. They can be found under My Computer > Properties > Advanced > Environment Variables. Create two new system variables and call them ANT_HOME and JAVA_HOME. ANT_HOME should point to the directory where ant is located and JAVA_HOME should point to the location of your Java directory. Append %ANT_HOME%/bin and %JAVA_HOME%/bin to the end of the existing PATH variable. You can test if Ant and Java are running properly by typing ant -version and java -version into the command line. If you get a version number as the output then it has been installed correctly.
Run build.xml from the root by navigating to your wet-boew folder and run: > build.cmd. This will run a series of different ant scripts depending upon what is included in the main build.xml file. Notice that there are a series of paths in the root build.xml which point to different build.xml files in other nested folders. These build.xml files are located under each sub-folder in the src folder.
Running Ant script using Eclipse
If you’d prefer to use an IDE to run your scripts and view your files, download the "Eclipse IDE for Java EE Developers" as it will have everything you need to run your project.
Software requirements
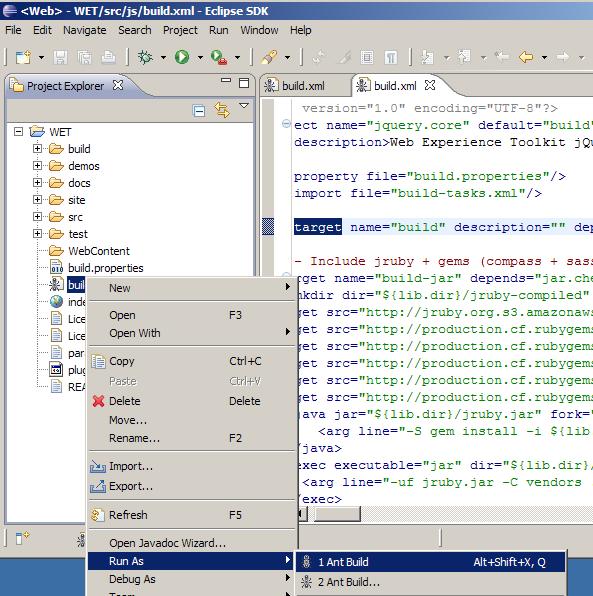
Open up eclipse and create a new general project. Right click on your project folder in the project explorer window and select "Import". Select General > File System and navigate to the WET folder. Once imported, you should see all the directories and files the wet project on the left hand side. Run the build.xml file by right clicking on it and selecting Run As > Ant Build.
You can see the progress of the build below your code view in the Console window. If you cannot see it, select Window > Show View > Console. This view allows you to debug errors in the build.
Running Ant script using Notepad++
Use Notepad++? You can build WET right from within it by setting up a Run menu option.
Software requirements
-
Open Notepad++, press F5 and enter the following code:
cmd /c d: & cd "d:\Projects\GitHub\wet-boew" & ant & pauseBe sure to modify:
- The drive d: and the d:\Projects\GitHub\wet-boew path to reflect the location of your wet-boew folder.
- The c:\ant\bin\ant to the location of your ant files.
- Click the Save... button
- Enter Build WET-BOEW and optionally choose a keyboard accelerator.
- Click OK.
You will then be able to build WET-BOEW anytime using the specified keyboard accelerator in Notepad++ or by clicking on Run > Build WET-BOEW.
Proxy issues
The build will download several files during the first build so those behind restrictive firewalls may encounter issues. See the Ant Proxy manual for further information.
Autoproxy flag
The first way to get Ant to work through the proxy is by using the "autoproxy" flag at the command line ant -autoproxy
Passing values through ANT_OPTS
If the "autoproxy" flag doesn't work, you should try manually setting your proxy information in the ANT_OPTS environmental variable.
On Windows you can use the build.cmd to set the ANT_OPTS variable:
build.cmd -Dhttp.proxyHost=PROXY -Dhttp.proxyPort=PORT
Manually download through the browser
If issues are still encountered, you may manually download the required files to their expected location before running Ant. Note that the below versions may change, you may verify the versions required in build/build-tasks.properties
- Download jRuby to build/lib
- Create the folder build/lib/jruby-compiled and copy the following gems inside:
- Date de modification :