Using GitHub for WET
Contributing on GitHub
In order to contribute to the WET project, you will have to use Git to commit your changes. The following is a explanation on using Git for this purpose. The image and steps below illustrate the process you will take when contributing to wet-boew.
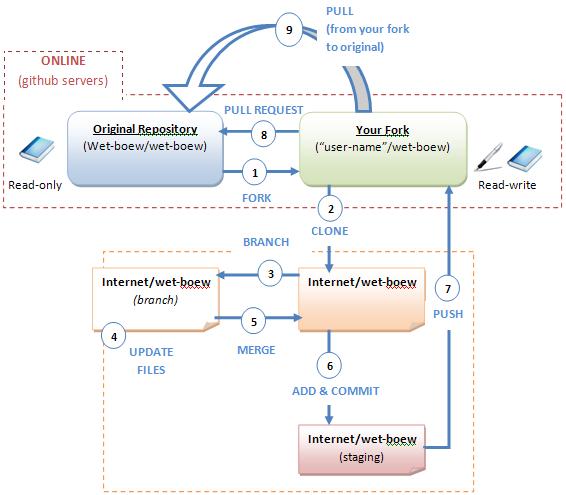
- Fork from the original repository
- Clone your forked repository to your local machine.
- Create a branch.
- Update your files.
- Make your changes.
- Add and commit your changes.
- Push your changes onto your forked repository on GitHub.
- Send a pull request to the appropriate branch on wet-boew/wet-boew.
- The pull request is accepted.
Software requirements
- GitHub: An account with GitHub is required.
- Git client: In order to contribute to the project, you will need to download a Git client. There are a variety of different options, however, Git Bash is used in this tutorial.
- Ant: Apache Ant needs to be installed on the machine you are using with the environment variables configured correctly.
- Java SE: Java SE needs to be installed on the machine you are using with the environment variables configured correctly.
Getting started
- Create a GitHub user name and password
- Open GIT Bash
- Set your user name and email address:
$ git config --global user.name "John Doe"$ git config --global user.email johndoe@example.com
Fork WET
Forking is copying an existing repository to another repository under your user name. If you do not have read + write privileges, this is the first step to contributing to WET.
- Fork an existing repository by going to the repository page on GitHub. In this case, you will want to navigate to: https://github.com/wet-boew/wet-boew.
- Click on the "Fork" button on the top right.
- This will create a copy of the repository on the GitHub website. This repository is under your user name and does not modify the original wet-boew repository if changes are made to it.
- Notice how the repository you forked was not called wet-boew/wet-boew? Your repository instead is called "yourusername"/wet-boew
Clone the project
Clone the project on your local machine to work on the project. This will copy all the files folders to your local machine.
$ git clone https://github.com/"yourusername"/wet-boew.git
Important: Whenever you want to make changes to a repository located on your computer (in this case your wet-boew clone), navigate to it using:
$ cd "repository name"
Configure remotes
A remote is a repository stored on another computer, in this case on GitHub’s server.
When you clone a project, a default remote called "origin" is automatically created which points to your fork on GitHub (not the original repository).
It is important to point back to the original wet-boew repository by adding a new remote. (This remote is usually named "upstream", but you can call it whatever you want.) This will allow you to fetch the changes made to the original repository and add them to your fork.
$ git remote add upstream git://github.com/wet-boew/wet-boew.git
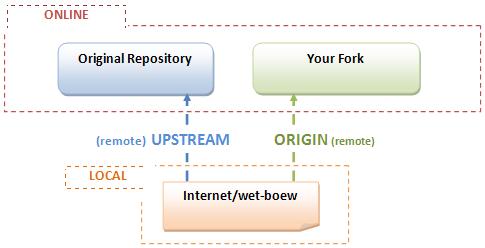
A remote is a pointer to a repository on GitHub. In this case, you will have a remote to your forked repository and a remote to the original wet-boew repository.
Get all of the changes to the WET repository and add them to your local machine using fetch and merge. The pull command does just that; it fetches the files and folders in the original wet-boew repository and attempts to merge it with the copy on your computer. You may have to fix any merge conflicts if they appear.
$ git pull upstream
Remove a remote
$ git remote rm upstream
Branching
In order to contribute back to the wet-boew/wet-boew project without any merge conflicts, you will have to set up a branch. A branch allows you to keep the WET files forked from wet-boew/wet-boew untouched while you work on your variation of these files.
-
Create a new branch and make it active ("myBranch" can be any name you specify):
$ git checkout -b myBranch -
Switch between branches using checkout. Remember that "master" is your main branch.
$ git checkout "branchname" -
Once you’re finished working on your branch and are ready to combine it back into the master branch, use merge. Make sure you checkout to the master branch if you want to merge with the master branch.
$ git checkout master$ git merge myBranch - You may see a variety of conflicts as you are doing this. Make sure to resolve these conflicts.
- Once you are finished with your branch, delete it using
git branch -d
Note: if you haven’t merged a branch, Git won’t let you delete it with this command; you’ll need to use an uppercase D in the option.
$ git branch -d branchname
Commit
A commit is essentially a snapshot of all the files in your project at a particular point in time. It is done locally, where you have stored your files, '''not''' on your GitHub repository. This means that you won't see any changes online - until you perform a push.
-
"Add" the files you want to capture in your commit.
$ git add fileorfolderNote: Use
$ git add --allto add everything. -
Commit your changes and add a message.
$ git commit -m " Whatever message you want to add "
Push to your fork
- You must push your changes from your local machine to your repository on GitHub's servers. Remember that "origin" is the remote that points to your forked repository on GitHub.
- "Master" or "vx.x" (e.g., v3.0) is the default branch name. You can create multiple branches, but the default is usually master. More on that later.
$ git push -u origin master
Remember that this push will update your fork of the original repository on GitHub, NOT the original repository itself.
Contribute to the original repository
In order to contribute back to the original repository (in this case wet-boew/wet-boew), you have to request that someone with read-write access to wet-boew/wet-boew take what you have in your fork and add it to their repository. This means that they will be performing a PULL (fetch and merge) of your forked repository.
In order to inform the wet-boew/wet-boew group to add your files from the fork, you can send the original author a pull request. A pull request is simply a notice asking them to pull from your fork.

The pull request process involves asking the owners of the wet-boew/wet-boew repository to take your changes. If your changes are expected, wet-boew will pull the files off your fork.
- Navigate to your fork of the original repository on GitHub ("your user name"/wet-boew)
- Make sure that it is updated with all the content you'd like to add to the original repository.
- Click on the Pull Request button on the page and send your request.
If your request is accepted, your changes will be merged with the WET repository on GitHub.
Related pages
- Date modified: